Getting Started with HR Partner
Congratulations! You’ve signed up with HR Partner and can look forward to saving lots of time and streamlining your HR efforts. Plus, you’ll be able to sleep easier knowing all of your employee records are in one, secure place.
But where do you go from here? What do you actually do first? Glad you asked!
HR Partner is a simple-to-use HR (human resources) management app for you and your employees. While being easy to use, there is a lot of power under the hood - which is why we created this quick guide to help you become familiar with the app in the least time possible.
Here's our guide to getting started...
- Basic Setup
- Inviting Other Admin Users
- Adding Your Employees
- Setting Up Time Off / Leave
- Setting Starting Leave Balances
- Creating Your Company Library
- Inviting Your Team to the Employee Portal
- Next Steps
You can also download our > Getting Started Checklist < so that you can check things off as you go along.

Basic Setup
Company Info
Here’s where you set up the most important parameters for your company. Of course, you can add things and change them later, but it’s generally recommended that you get the basics right first…
To do this, go to Setup > Company Info from the side menu, then work through the sections there. In particular;
- Check your Company Name
- Set the country for your Company (of the head office)
- Set your Company’s timezone (of head office)
- Upload your Company logo
- Choose your preferred name format
- Also select which Additional Modules you want to enable or disable (Hint: If you’re not going to use them initially, turn them off to keep things simple.)
Categories
Next, set up your categories - these are the 'major' drop down lists that apply to each employee you have. You can set them up by going to Setup > Configure > Categories.
It’s particularly important to setup your;
- Departments
- Employment Statuses
- Locations
- Groups (optional)
Less crucial, but you might also want to add customised;
- Positions
- Termination Reasons
- News Categories (if you’re planning to use the News module)
- Tags
You can always add more or edit them later, but it really helps to get the basics right.
Lists
Then, go into the Lists area and set up the List options for your Company. You’ll find this under Setup > Configure > Lists. Note that these can also be added “on the fly,” but it’s good to get them started.
It’s most important to configure your options for;
- Absence Statuses
And perhaps;
- Performance Review types
- Asset Types
- Renewable Document Types
- Training Types
- Or any other lists in this section
Custom Fields (optional)
If your company wants to track something specific for employees that is not included by default, you can create your own Custom Fields.
You’ll find this under: Setup > Configure > Custom Fields
You can add different types of fields here: text, numbers, date/time, checkbox, etc.
NOTE: You can always edit your Categories, Lists or Custom Fields later, but it is better to do this now. That way, they'll be all ready for when you add your employees. If you like, you can even import your employees with this information (eg the Locations, Departments and Positions for each employee). But to do this, they need to be setup here first.
Inviting Other Admin Users
Adding other Admin Users can help your Company get everything entered and make your life a lot easier. The sooner you get others involved, the better!
To add Admin Users, go to Setup > Users, then click “Add a New User”.
Enter their name, email address, and choose whether they’re an employee already in HR Partner. Then go through and select their permissions. In particular, choose which Modules they should have access to, and decide if you want them to have access to all Departments and Locations, or just selected ones.
Once you’ve done that, you should take some time to go through HR Partner with them and explain what you want help with - usually entering data and files at this stage! You can also share this video tutorial here.
Adding Your Employees
Now it’s time to add some employees to HR Partner.
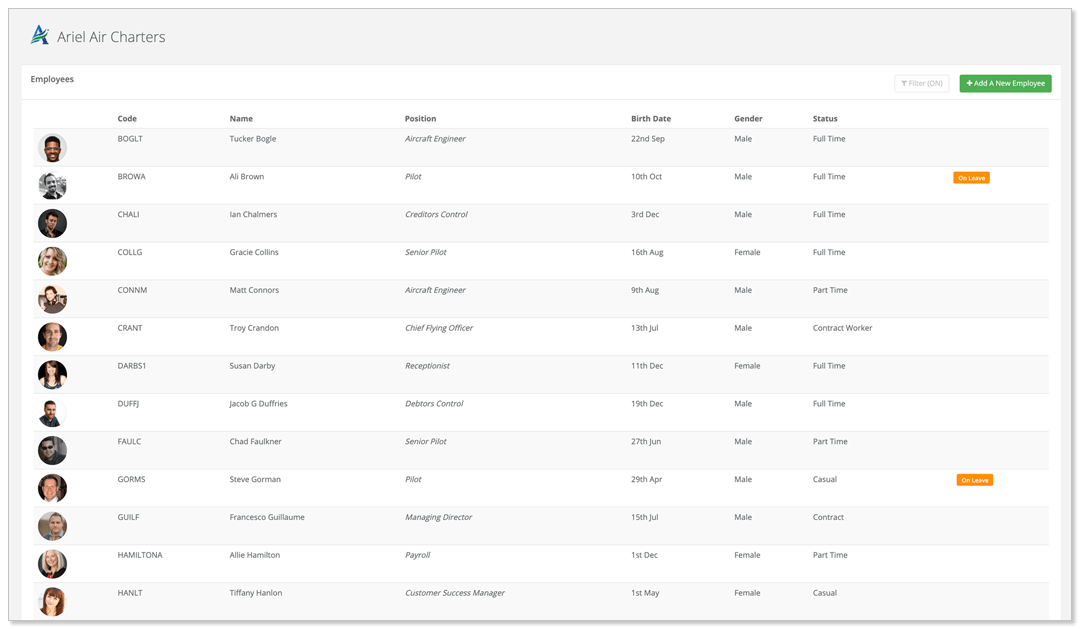
There are actually 3 different ways you can add employees in HR Partner;
-
Manually Add Employees Individually
To add employees one by one, simply go to Employees > All Employees, then click the “Add Employee” button. (There’s also a shortcut from the dashboard.)
-
Import a CSV File
To import employees, go to Employees > Import > Import CSV. There you’ll find a sample spreadsheet and instructions.
-
Link to a Payroll System
If you are integrating with a compatible payroll system (like Xero or KeyPay), you can use this to import your employees from that system.
First you need to set up the integration under Setup > Configure > IntegrationsThen, go to Employees > Import > Integration
You can see more details on each of these methods for Adding New Employees here.
TIP: Depending is size of your company, you may want to add employees from just one department or one location. This way, you can focus on a subset of your team members and add in all of the appropriate information you want for them, and get them using the system properly before adding more.
This staggered rollout can be a good way to ease your company into using HR Partner.
Once your employees have been added to HR Partner, you can then go through the Employee Records Modules and add the information you want to start recording straight away. For instance, you might decide to get everyone's "Positions and Salaries" informationAdd employees one by one and go through all modules they want to use and get as much information for each employee one at a time, or
If you have quite a few employees, chances are you might want to enlist some help! Here’s where it pays to enlist the support of your fellow Admin Users.
NOTE: Check that you've setup the reporting lines correctly by reviewing your Org Chart (found under Employees > Org Chart). For this to work, there can only be one employee with nobody to report to (the person at the top of the chart!) This tool will show you if there is any missing reporting information.
Setting Up Time Off / Leave
Before you can start using Time Off or Leave within HR Partner, you need to get your company settings right first.
NOTE: You can skip this section if you will not be using HR Partner to track employee leave or letting your employees enter leave requests to be approved. In this case, you can disable the ability for employees to apply for leave via the portal so that they do not get confused! (This setting is found under Setup > Time Off / Leave > Leave Settings.)
Leave Settings
First, go to; Setup > Time Off/Leave > Leave Settings. Here, you need to;
- Select whether you want employees to be able to request leave through the employee portal
- Select which day of the week your work week starts
- Choose the visibility your employees have of other people’s leave (everyone, just their department, etc)
- Select the default number of hours a day employees work
- Select the default working day template (for most employees). These are setup under Setup > Time Off/Leave > Work Days.
Most companies find the most of the default settings here are fine, but this is where you can get some more flexibility if you need it.
If you are the person that leave approvals, you can enter this here too. Otherwise, you’ll need to come back to this once you’ve entered the other Admin Users.
Leave Policies
Next, we need to set up your leave policies. To do this, go to; Setup > Time Off/Leave > Leave Policies.
NOTE: You can skip this step if your HR Partner is integrated with a payroll system.
Add each type of leave your company offers and set the parameters for each including allowance per year, whether the leave resets on an anniversary or particular date, whether unused leave carries over into the next year etc. (Note: Please contact our support team if you need more assistance in this area). See more details about Setting Up Time Off & Leave Policies here as well as the definitions for Time Off and Leave terms.
The leave policies you set up will be used to calculate the amount of time off that your employees will have so it's important that you get the ‘rules’ correct for best results in HR Partner. Only set up the policies that your company needs, and remove others that don’t apply. When setting up a policy, please carefully check the following:
- The name of the policy is easily understood by your employees
- Auto accruals are turned on for this leave type
- The default annual allowance is set correctly (you can change allowances for individual employees later)
- Any rules around resetting the leave every year, and/or carrying over balances into the new year, are set correctly
- Choose an appropriate color for the policy, which will show on all the calendars in the system
- Setup any Restrictions that apply to this leave policy (eg only for certain Locations, Employment Statuses, etc).
Work Days
Next, check that the default work days are correct for your Company. To do this, go to; Setup > Time Off/Leave > Work Days. Nominate the default working days (e.g. Monday to Friday) and the default working hours per day for most employees.
Usually you only need one for Monday to Friday, but if you have part-time or contract employees who work odd days, you can set extra work day templates in here for them - these will affect their leave and time off calculations later.
See details on Setting Up Working Day Templates here.
Holidays
This is where you can set up public holidays for your Company which will show on your calendars in the system, and be factored into the ‘days off’ calculations for your employee time off. To do this, go to; Setup > Time Off/Leave > Holidays.
You can either add them manually or import for your country (recommended!). If you have several locations, you can choose which holidays apply to each location. You can also delete any that don’t apply for your Company.
See details about Entering Public and Bank Holidays here.
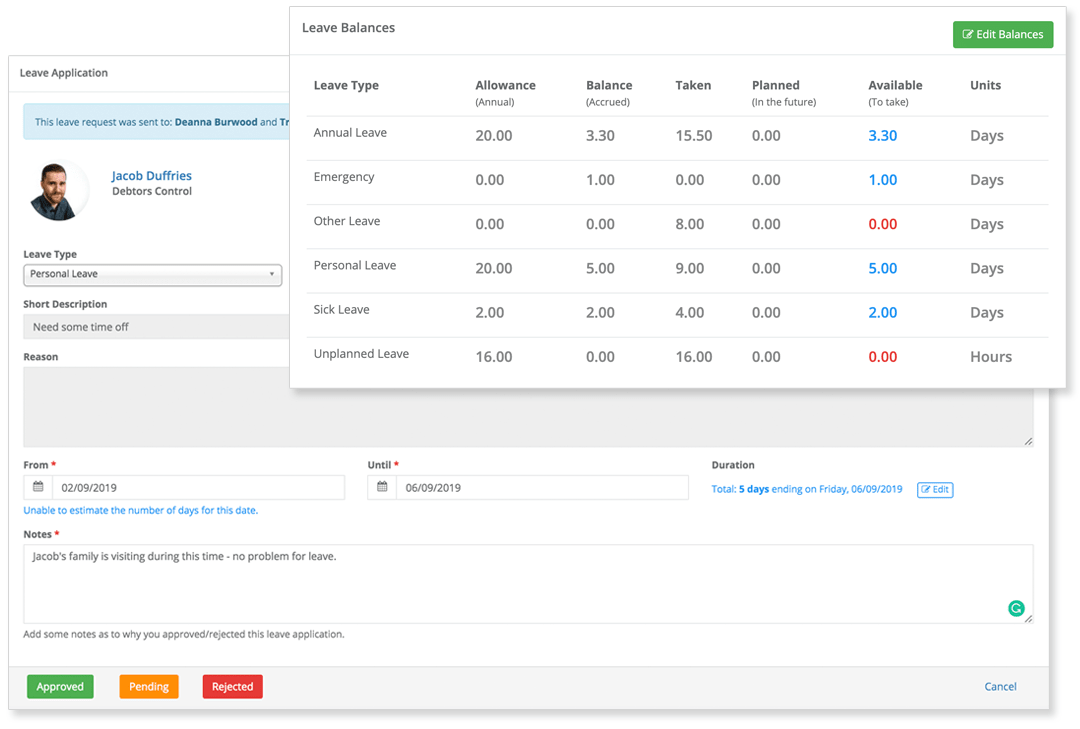
Setting Starting Leave Balances
Although you've setup your Leave Policies, HR Partner doesn't know how much leave each employee has already taken and what their current balances should be. You don't need to add past records for this, but instead, you need to update all of their starting balances.
To do this, pick a point in time a date that you will change the leave calculations over to HR Partner. Then export data for that date (usually from your payroll system), go to Time Off / Leave > Balances, then click on the "Allow Editing" button in the top right. Then go through each employee and update their balances (current for the date you've chosen), for each type of Leave. Again, if you have a lot of employees, you may wish to do this in batches.
Don't forget, we have a detailed article the full help article and section on Adjusting Leave Balances here.
WARNING: Before inviting employees to use HR Partner, it is important to ensure that all leave balances are accurate and leave policies are working properly. Employees tend not to like it if there are errors in this area 😉
Creating Your Company Library
The Company Library is where you store Company-wide documents that your employees can download and look at via their portal. You can both upload files and add links, as well as set up your own hierarchical structure of categories (or ‘folders’) to store files in, as well as set departmental-level permissions for folders.
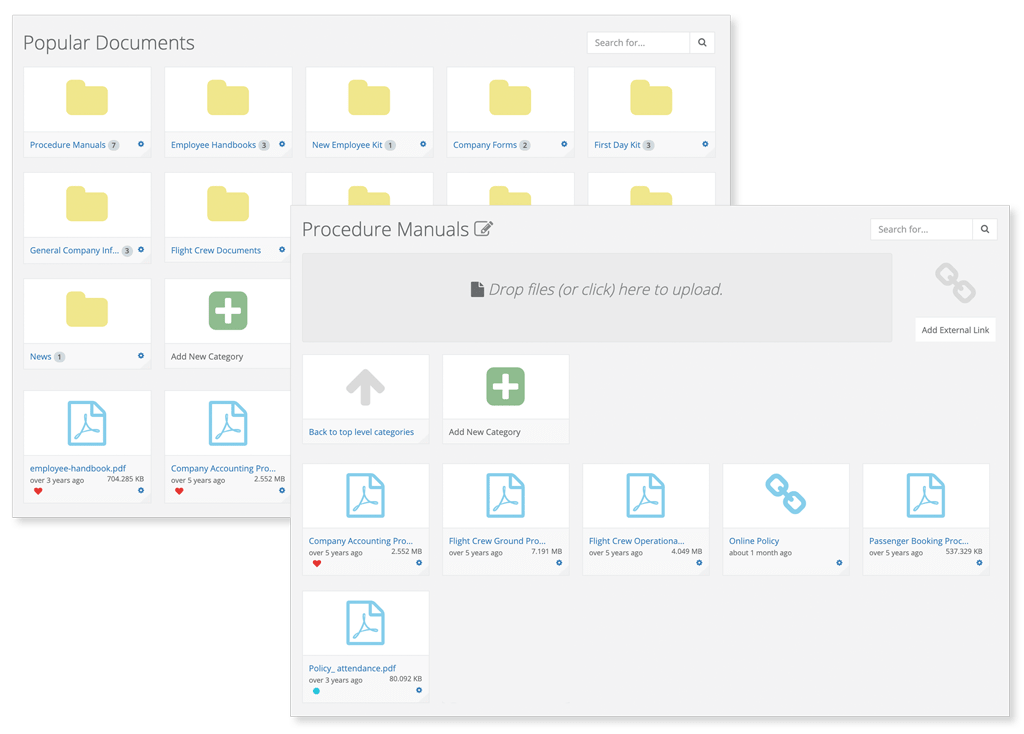
To add documents, simply upload them by clicking in the upload area, or add links by clicking on "Add External Link". External links can be to files, help on Dropbox, Google Drive or anywhere on the web. Just make sure that your team members have access to all the files you want them to view.
To set up categories, simply go to the Library menu option, then;
- Add New Category
- Set the permissions for the category
- Upload or add links to the relevant files
See details about Using the Document Library here.
Inviting Your Team to the Employee Portal
Now that you have your employees entered and all of their leave balances up-to-date and accurate, you can start getting your team involved. To do this, just go to Employees > Self-Service and then choose which employees you want to invite. (Note that you can re-invite people and also select all employees who have never logged in.)
TIP: Before you invite your employees to the employee portal, it's often a good idea to run through some information sessions and basic training with them. You may wish to do a demonstration and setup an Example Employee so that you can login and show them what to expect.
You can see the Help Resources for Employees here, but if you'd like a custom training session for your employees, just reach out to us, and we may be able to prepare a custom Training Webinar.
When introducing employees to HR Partner, some things to cover include;
- Encourage them to enter their contact details, photo, and also an introduction/biography about themselves
- Show them how to view the employee directory and see their colleagues' (public) details
- Show them how to access documents in the Company Library
- And perhaps most importantly, explain how they can submit Leave Requests.
See also our article about Inviting Your Team to the Employee Portal here.
Next Steps
Congratulations! You’ve made it through the core setup steps! 👏👏👏 You now have your Employee Records online, and employees can start submitting leave requests.
Of course, there's much more to HR Partner, though, and you can feel free to jump into these areas as well. You may want to dive into;
- Communicating with Employees
- Recruitment
- Checklists (usually for Onboarding)
- eSignatures
- Expense Claims
- Custom Forms
- Timesheets
- Projects and Costing
- Reports
So from here on, it’s "choose your own adventure"...
Also check out more tutorials in our Knowledge Base here.
But if you ever get stuck, don’t hesitate to reach out to our support team - just email us or click on the chat icon in the bottom right corner of every HR Partner screen (see below). This will open a chat window where you can talk directly to one of our support team. If we are not available, we'll respond to you via email as soon as we can.
